Sunday 19 August 2012

Newspaper Woven Basket


Recycled Materials Basket Tutorial

Materials:
Newspaper
Pegs
Stapler
Scissors

Before making a basket you will first have to prepare your materials. For the basket we are going to make we are going to use newspapers which we need to fold into strips.

Fold each sheet of newspaper along its length into the centre from both sides and crease. Do this 4 times in total and hold the resulting strip with a peg while you make the rest. For our basket we are going to use 8 strips but you can use any even number to make a bigger basket, but remember, the bigger the base, the shorter the sides unless you add more material.
 
Mark the centre of two strips and using this as a guide, weave the other strips under and over to make the base, making sure there are the same number of strips either side of each mark.

Staple each corner to hold the strips in place, these can be removed at the end.

Starting with the side nearest you, cross the middle two strips over at a right angle, keeping the over/ under pattern going. Take up the strips either side and add them in. Peg in place.

Continue working around the other three sides and you will find that you will begin to see where the strips should be woven. Use pegs to hold your work in place while working on another part of the basket, pulling gently on the strips to keep the weave tight.

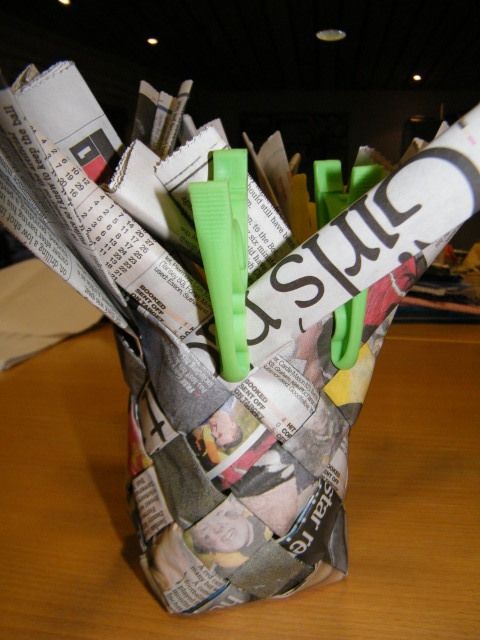
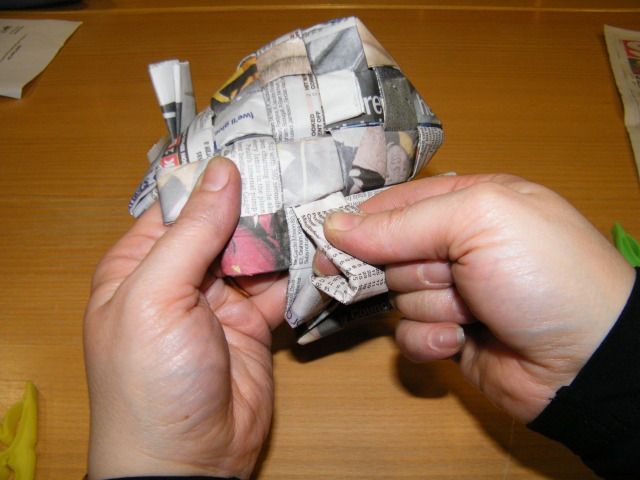
To finish your basket pick two weavers next to each other. I am starting with the ones held by the green peg.

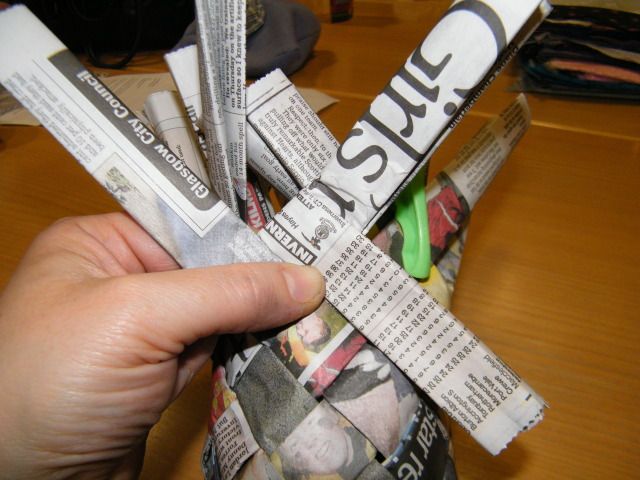
Fold the left hand weaver over the right hand one, then fold the right hand weaver over the top of the first weaver and behind the next weaver to the left.

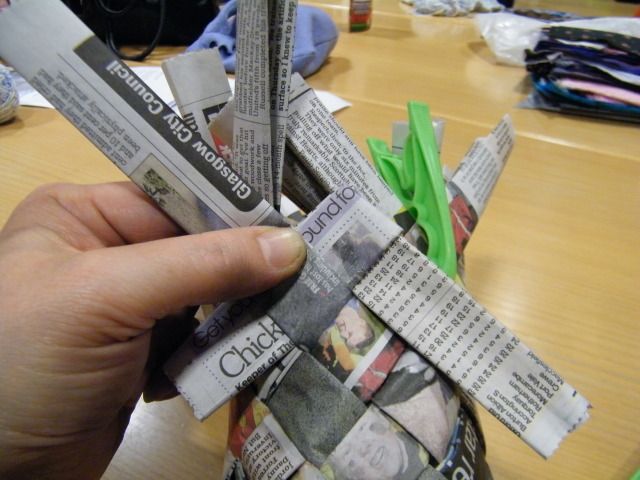
Continue working around the basket to the left in this way until all the weavers are secure. The last one will need to be tucked into place behind the first one.


Excess length can be woven into the basket to make it more secure, trimming off any bits that are too long.


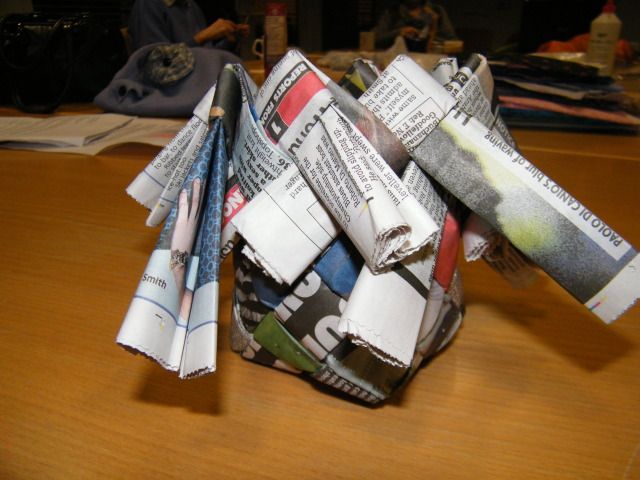
If necessary, crease the basket along the edges of the base to make it stand straight.

Other materials that can be used for plaited baskets are cardboard strips, fruit juice cartons cut on a spiral to make longer strips, magazines, fabric strips, dried plant materials (you may need to spray them first to make them flexible,do not use them green as they will shrink as they dry)- montbretia, flax, etc. use your imagination and see what you come up with. Making something useful from ‘rubbish’ is very satisfying.

Ex


Continue

Thursday 5 April 2012

More a rant than a ramble!

I'm in Edinburgh on holiday and I have noticed when walking around that more and more small children are becoming second fiddle to technology.
  • Why is it okay to dangle your child in a pushchair over the edge of the pavement while waiting for the traffic to stop? Oh, yes, you're on your phone and didn't notice that big double-decker bus bearing down on you!
  • Your ipad needs attention while you walk along Princes Street? Of course you should let go of your toddler son's hand and leave him to trail after you while you use both hands for your important IT mission. Luckily the small boy did follow his father jumping over the cracks in the pavement and following a pair of shoes because Dad didn't look back.

These are just a couple of examples, there are also wonderful examples of parenting too - of course there are, for example: the mother on the bus spotting numbers with her child while they switched effortlessly between English and Chinese languages. (He called thank you to the driver when he got off too which made me smile).

But when did technology become more important than a child? Why is it so important to keep in touch with your friends or work you lose touch with the person you are with? Children grow up so fast and are surrounded by technology at home, surely while out and about at the very least they deserve some attention, to be kept safe, communicated with and feel important?

Sunday 4 March 2012

Caitlin's sensory quilt

I've been wanting to blog this bit of craft work for a while but had to wait until the birthday of the recipient, my niece Caitlin. Caitlin has cerebral palsy and spends a lot of time on the floor so I have made her a recycled sensory quilt. Each square is a different fabric, some from old clothes, some remnants from other projects or charity shop finds and some from gifts.


From left to right the fabrics are:
top row: remnant from covering my son's pushchair (he is now 17!), charity shop scarf, curtain remnant with netting attached, remnant from a page boy's waistcoat with velvet ribbon across, shiny lurex remnant (gift)
2nd row: piece of Caitlin's sister's (Chloe) old pj's, remnant with a baby wipes pack sewn behind for noise, piece of Chloe's old t-shirt, silver charity shop find, my old jeans with piece of ribbon
middle row: flannelette with fleece pocket, crushed velvet - an OLD dress of mine, fur fabric remnant - donated, fabric remnant with lace doiley attached, silky charity shop remnant
4th row: remnant from my daughter's cot sheet, remnant from a fancy dress skirt, my husband's shirt, remnant from a dress I made my daughter, charity shop skirt
bottom row: satiny remnant (donated), piece of a fleece jacket I made my oldest (now 25) inc. pocket, piece from a pair of pyjamas with satin belt attached containing bells, remnant from a cloak I made my oldest and Chloe's jeans with bell sewn in the pocket.

The quilt is backed with a child's sleeping bag that had a broken zip and edged with wide ribbon that has more bells hidden inside it. This ribbon and the loop side velcro patches on the quilt are the only bits not recycled.

The velcro patches are for attaching sensory items I have made and there are also 3 loops for attaching Caitlin's toys. There are different textures of butterflies, a bag with wooden beads and bells sewn inside and some packaging ribbon all securely sewn to the hook side of the velcro.


The folk at Loving Hands are making sensory items for their latest challenge and we have been picking each others brains on what works and what doesn't. I have made prototype one of a hand held sensory item and am about to try prototype 2, more on that at a later date! Many thanks to all who have contributed to this quilt and other sensory items with ideas, materials and inspiration.

Tuesday 17 January 2012

Easy Marbling


We are currently doing a project on Space in school and I found this idea through Pinterest and have been dying to try it out. (Original website) This morning I was working with Primary 1 (5 year olds - all 3 of them!) and we made planets. The idea is they have designed planets that they will name and write about.


First you cover a surface in shaving foam (not gel), I used a sand tray lid. The children chose paint colours and we drizzled the liquid paint over the surface of the foam. Then using the 'wrong' end of paintbrushes we wrote letters in the paint to swirl the colours (before I hit on this idea they were mixing which didn't have such a good effect).

The paper was pre-cut into circles and they took turns choosing where to put their planet and take a print by pressing down on the back of the paper. (Write names on the back of the paper before starting!) Next, they lifted the paper and placed it on a newspapered table.


It looks good at this point but the next bit is the real 'WOW!' bit. Scrape the foam off the paper, we used stiff card but next time I will use scrapers cut from plastic milk bottles. What you get is a marbled effect without expensive inks - very impressive. It is also very easy to clean up and leaves you with an interesting smell ... "This room smells like my dad!"


The last three photos show the progress of one picture on a rectangular piece of paper done after the planets.

Monday 16 January 2012

DS bag

I'm busy working on a sensory quilt for my niece, at the rate the ideas are coming in - it may be rather large! Not to be outdone, my 12 year old niece (sister of the one who is getting the sensory quilt) has been dropping hints that she needs a bag for her DS. I obtained an old pair of her jeans and came up with this, the ribbon, button and strap made from a belt are all recycled:


Editted to add, this bag is now lined with fleece fabric. It was a bit big as I cut it to fit the pocket size. The fleece (taken from a jacket I made my son about 16 years ago) makes the DS fit in more snugly and also provides padding to protect it.

Sunday 8 January 2012

Can you tell what it is yet?

Easily distracted as I am, especially from housework, I made something new today. I have been sorting through my clothes and find myself with a stack of items that no longer fit due to having lost 40lbs so far in my quest for a healthier me. This is what I came up with:


So - can you tell what it is yet?


My hubby gave me a kindle for Christmas and I wanted to protect it but the pockets online are expensive and not particularly 'me'. So, I made a kindle protector from the back of one of my pairs of now redundant jeans. It even has a pocket to keep the charging cord in. I hope you like it!

Monday 2 January 2012

Crochet a Basket from Sheets!

This is my first attempt at a blog tutorial so I would appreciate any feedback.

My daughter wants a waste paper basket for her craft room/ spare room - and I can do baskets. I wanted to make one from recycled materials and toyed with the idea of weaving one with old jeans and t-shirts then I came upon a blog showing me how to crochet baskets from t-shirts. However it says that the curve in her baskets comes as a natural result of the elasticity of the fabric used. Back to square one as I wanted a straight sided basket. Remembering I had yarn made from old sheets upstairs in my craft room that I had made to use on my rug loom and not used, I decided to try crocheting with it and adapt the pattern to suit.

The first photo shows the base and the point at which I decided it was a goer.


To make this for yourself you first need the yarn. Measure along the top of your sheet and snip at 1" intervals. You can then tear down the length of the sheet quite easily. I have done this with both polycotton and flannelette sheets. Snip a small slit lengthways in each end of each strip and holding a piece in each hand join by pushing the lefthand piece through slit in the righthand piece and then threading the other end of the righthand piece through the lefthand slit. Pull tight and continue until you have used all the pieces and have a large ball ready to go. This creates a continuous piece of yarn that doesn't have bulky knots in it. I hope this photograph helps explain what I have been saying:


I used 2 balls for this, one made from a double sheet we got as a wedding present 26 years ago and one made from a double duvet cover I bought in a charity shop. You will also need a crochet hook, I used a 10mm one. OK, now for the pattern (written in English crochet terms):

Chain 2
6 dc in 2nd chain from hook

Continue in a spiral, marking the beginning of each round with a thread (orange in my photographs)

Crochet 2dc in each sc in round
dc in next dc, crochet 2dc in next dc, repeat around
dc in next 2 dc, 2dc in next dc, repeat
dc in next 3 dc, 2dc in next dc, repeat
dc in next 4 dc, 2dc in next dc, repeat
dc in next 5 dc, 2dc in next dc, repeat
dc in next 6 dc, 2dc in next dc, repeat

Continue with the pattern increase until the basket base is the size you want. Mine was 10" and ended with dc in next 8dc, 2dc in next dc.

DC in the back loop of each stitch in round. From now on you are making the sides of your basket and will be crocheting through both loops of each stitch again. Keep moving your marker up as you go so you know where the start of the round is, change yarns if you want stripes.


When you have reached the required height of you basket, you can do a slip stitch to finish or add handles. I decided to put on short handles. In the second last row I chained 10 and missed 8 stitches dc'ed to the opposite handle space, ch 10 and missed 8 dc and dc to the beginning of the row. Next round dc all round including in each ch, slip stitch to finish, pull end of yarn though the loop and hide it in your basketry!


Experiment with sizes. Make long handles for a shopping bag, or shorter sides and no handles for a fruit basket. Just make bases for coasters and placemats. Remember everything you make like this will be washable! Have fun playing, I'm going to - and will be casting an eye over the sheets in the airing cupboard soon!