This is my first attempt at a blog tutorial so I would appreciate any feedback.
My daughter wants a waste paper basket for her craft room/ spare room - and I can do baskets. I wanted to make one from recycled materials and toyed with the idea of weaving one with old jeans and t-shirts then I came upon a blog showing me
how to crochet baskets from t-shirts. However it says that the curve in her baskets comes as a natural result of the elasticity of the fabric used. Back to square one as I wanted a straight sided basket. Remembering I had yarn made from old sheets upstairs in my craft room that I had made to use on my rug loom and not used, I decided to try crocheting with it and adapt the pattern to suit.
The first photo shows the base and the point at which I decided it was a goer.

To make this for yourself you first need the yarn. Measure along the top of your sheet and snip at 1" intervals. You can then tear down the length of the sheet quite easily. I have done this with both polycotton and flannelette sheets. Snip a small slit lengthways in each end of each strip and holding a piece in each hand join by pushing the lefthand piece through slit in the righthand piece and then threading the other end of the righthand piece through the lefthand slit. Pull tight and continue until you have used all the pieces and have a large ball ready to go. This creates a continuous piece of yarn that doesn't have bulky knots in it. I hope this photograph helps explain what I have been saying:

I used 2 balls for this, one made from a double sheet we got as a wedding present 26 years ago and one made from a double duvet cover I bought in a charity shop. You will also need a crochet hook, I used a 10mm one. OK, now for the pattern (written in English crochet terms):
Chain 2
6 dc in 2nd chain from hook
Continue in a spiral, marking the beginning of each round with a thread (orange in my photographs)
Crochet 2dc in each sc
in round
dc in next dc, crochet 2dc in next dc, repeat around
dc in next 2 dc, 2dc in next dc, repeat
dc in next 3 dc, 2dc in next dc, repeat
dc in next 4 dc, 2dc in next dc, repeat
dc in next 5 dc, 2dc in next dc, repeat
dc in next 6 dc, 2dc in next dc, repeat
Continue with the pattern increase until the basket base is the size you want. Mine was 10" and ended with dc in next 8dc, 2dc in next dc.
DC in the back loop of each stitch in round. From now on you are making the sides of your basket and will be crocheting through both loops of each stitch again. Keep moving your marker up as you go so you know where the start of the round is, change yarns if you want stripes.
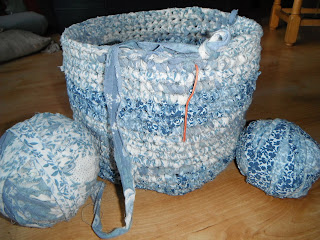
When you have reached the required height of you basket, you can do a slip stitch to finish or add handles. I decided to put on short handles. In the second last row I chained 10 and missed 8 stitches dc'ed to the opposite handle space, ch 10 and missed 8 dc and dc to the beginning of the row. Next round dc all round including in each ch, slip stitch to finish, pull end of yarn though the loop and hide it in your basketry!

Experiment with sizes. Make long handles for a shopping bag, or shorter sides and no handles for a fruit basket. Just make bases for coasters and placemats. Remember everything you make like this will be washable! Have fun playing, I'm going to - and will be casting an eye over the sheets in the airing cupboard soon!

 Paint tray ready to print
 Paper before scraping off the foam
 The finished picture


